Why Homemade Vegan Milk is Your New Kitchen Essential
In a world increasingly conscious of health, ethics, and environmental impact, plant-based milks have soared in popularity. From creamy oat lattes to refreshing almond smoothies, dairy-free alternatives are now staples in many refrigerators. But what if we told you that the best plant-based milk isn't found on a supermarket shelf, but crafted right in your own kitchen? This isn't just about saving a few dollars; it's about reclaiming control over your diet, embracing pure ingredients, and unlocking a world of unparalleled flavour and freshness. Welcome to Homemade Vegan Milk Guide: Healthier, Cheaper & Delicious Dairy-Free Recipes, your ultimate guide to making easy homemade vegan milk and custom plant recipes, transforming your daily routines with delicious, wholesome beverages.
Ditch the Carton: The Unbeatable Benefits of Homemade Vegan Milk
At first glance, grabbing a carton of vegan milk from the store seems like the simplest option. So, why bother making it at home? The reasons are compelling, touching on everything from your health and wallet to the sheer delight of a truly fresh product. This section delves into why making homemade dairy-free milk is a game-changer for anyone seeking a purer, more cost-effective, and fully customizable plant-based lifestyle.
Purity You Can Taste: No Unwanted Additives
One of the most significant advantages of homemade vegan milk is its unparalleled purity. Store-bought varieties, even those marketed as "natural," are often laden with a cocktail of unnecessary ingredients. These can include:
- Preservatives: To extend shelf life, keeping products fresh for weeks or even months.
- Thickeners and Gums: Ingredients like gellan gum, carrageenan, xanthan gum, or locust bean gum are commonly used to create a creamy texture and prevent separation. While generally recognized as safe, some individuals experience digestive discomfort or prefer to avoid them. More importantly, these can sometimes mask a low percentage of the actual "milk" ingredient.
- Added Sweeteners: Many commercial plant milks contain refined sugars, corn syrup, or artificial sweeteners, often in quantities that add up quickly over daily consumption.
- Artificial Flavors: To enhance taste, sometimes to compensate for a low concentration of the primary ingredient.
When you make your own, you control every single ingredient. Typically, a base homemade plant milk requires just two: your chosen nut, seed, or grain, and water. This clean label approach means you're consuming only what you intend to, free from hidden extras.
A Savvier Sip: Unmatched Cost-Effectiveness
While an individual carton might not break the bank, the cumulative cost of store-bought vegan milk can be substantial, especially for regular consumers. Plant-based ingredients like oats, almonds, or cashews can be purchased in bulk at a fraction of the cost per serving compared to their pre-packaged milk counterparts. Consider this: a single bag of almonds can yield several batches of milk, costing you mere pennies per glass. When you step away from store-bought options, you'll discover that even with the addition of natural sweeteners or flavourings, your homemade concoctions will consistently be far more budget-friendly.
Total Control: Customization to Your Heart's Content
Have you ever wished your store-bought almond milk was a little creamier, or your oat milk less sweet? With homemade, you're the master chef. Want a richer, thicker consistency for your coffee or baking? Simply increase the ratio of your base ingredient to water. Prefer something lighter for a refreshing drink? Add more water. This level of customization extends beyond consistency:
- Sweetness: Add natural sweeteners like dates, maple syrup, or a touch of monk fruit to your exact preference, or skip them entirely.
- Flavour: Infuse your milk with vanilla, cinnamon, cardamom, or even cocoa for a delightful twist.
- Fortification: While commercial milks are often fortified with calcium and vitamins, you can also add your own vegan-friendly boosts at home, such as a pinch of food-grade calcium carbonate powder or a spoonful of plant-based protein powder for specific needs.
This autonomy not only ensures your milk perfectly suits your taste but also guarantees it aligns with any specific dietary requirements or preferences you may have. For more on this, check out our guide on Stop Buying Milk: DIY Dairy-Free Recipes for Purer Plant-Based Drinks.
Mastering the Basics: Your Simple How-To Guide
Making vegan milk at home is surprisingly straightforward, requiring minimal equipment and a few simple steps. The fundamental process remains largely consistent, regardless of your chosen base ingredient.
Essential Equipment for Your Vegan Milk Journey
Before you begin, gather these key tools:
- High-Speed Blender: This is crucial for breaking down nuts, seeds, and grains into a fine consistency, extracting maximum flavour and creaminess.
- Nut Milk Bag or Fine-Mesh Strainer/Cheesecloth: For straining the blended mixture to separate the liquid milk from the pulp. A nut milk bag is often preferred for its efficiency and ability to yield a smoother product.
- Large Bowl: To collect the strained milk.
- Airtight Jar or Bottle: For storing your freshly made milk.
The Core Process: Soak, Blend, Strain
While specific soaking times and ratios vary slightly by ingredient, the general method for making most homemade vegan milks is as follows:
- Soak (Optional but Recommended): For nuts (like almonds, cashews) and some seeds, soaking is key. It softens them, making them easier to blend, improving digestibility, and often leading to a creamier result. Soaking times can range from 4 hours to overnight. Grains like oats typically require less or no soaking (just a quick rinse).
- Rinse and Combine: After soaking, drain and thoroughly rinse your nuts, seeds, or grains. Transfer them to your high-speed blender.
- Add Water: Pour in fresh water. A common starting ratio is 1 part base ingredient to 3-4 parts water. For example, 1 cup of almonds to 3-4 cups of water. Adjust this ratio to achieve your desired thickness and creaminess.
- Blend: Blend on high speed for 1-2 minutes until the mixture is creamy and smooth. The longer you blend, the finer the particles will be, potentially leading to a smoother milk.
- Strain: Place your nut milk bag or cheesecloth over a large bowl. Pour the blended mixture into the bag/cloth. Gather the edges and gently squeeze to extract all the liquid milk. Be patient and squeeze firmly to get every last drop.
- Store: Transfer your fresh vegan milk to an airtight jar or bottle and refrigerate. Homemade milk typically stays fresh for 3-5 days.
Pro Tip: Don't discard the leftover pulp! It can be repurposed into crackers, energy balls, or even dehydrated and ground into flour.
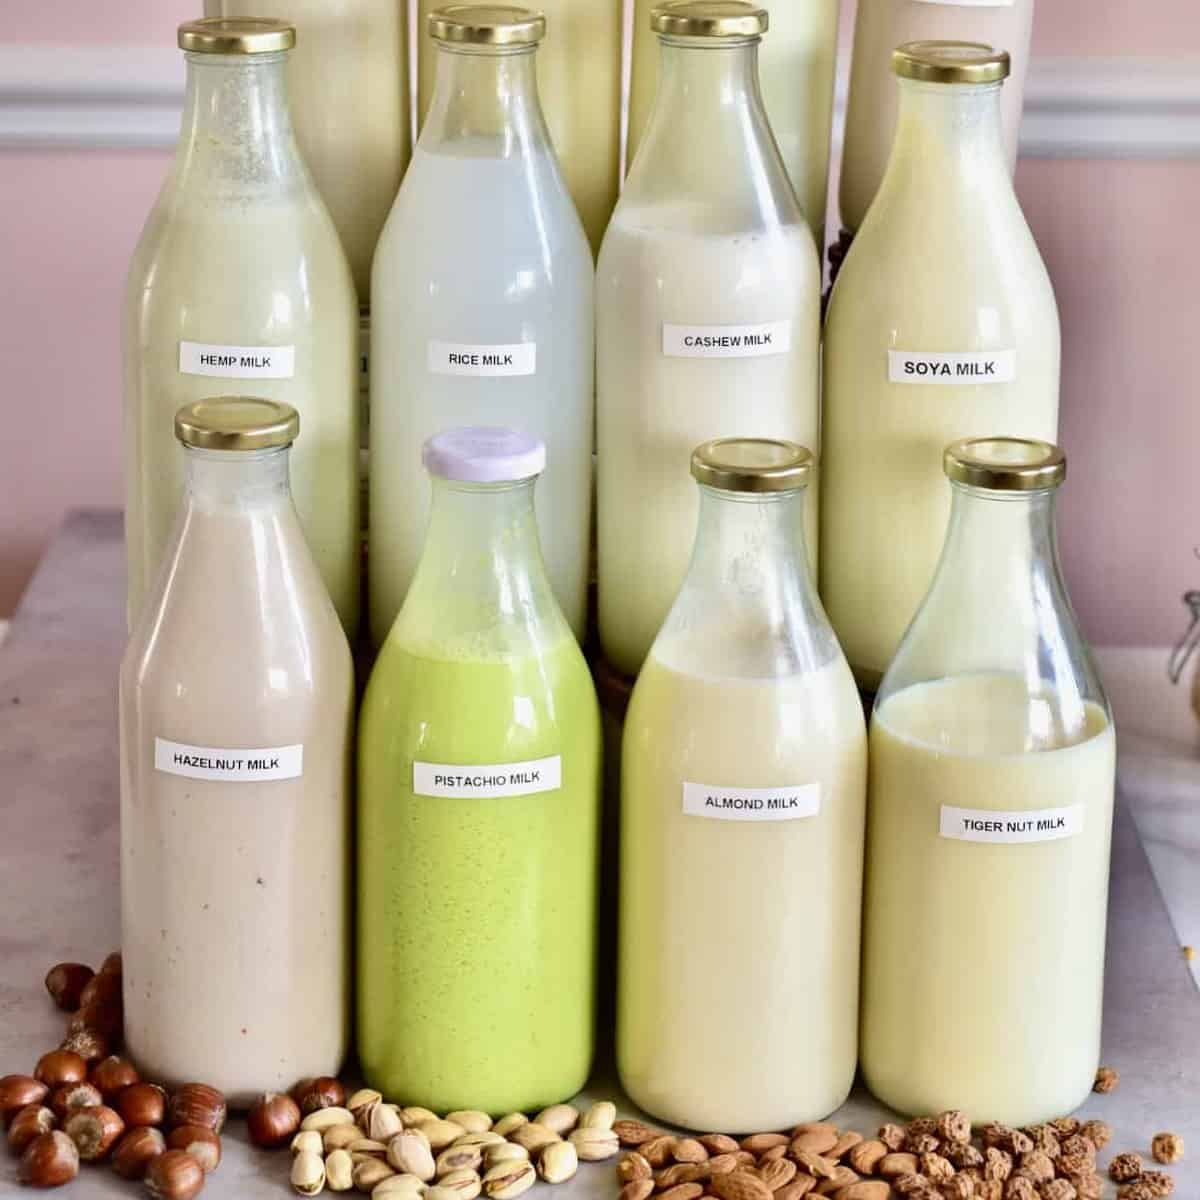
Exploring Your Plant-Based Pantry: A World of Milk Options
The beauty of homemade vegan milk lies in its incredible versatility. The options are vast, allowing you to choose based on taste, nutritional profile, allergies, and intended use. Here's a rundown of popular choices:
Nut Milks: Creamy & Versatile
- Almond Milk: A classic for good reason. Light, slightly nutty, and incredibly versatile for cereals, smoothies, or baking. For extra smoothness, you can blanch and peel almonds before soaking.
- Cashew Milk: Known for its exceptional creaminess and neutral flavour. Often, it doesn't even require straining if blended long enough, making it a popular choice for coffee and rich sauces.
- Hazelnut Milk: Boasts a rich, distinct nutty flavour, making it perfect for chocolate-based drinks, desserts, or a delightful addition to coffee.
Seed Milks: Allergen-Friendly & Nutrient-Dense
- Hemp Seed Milk: Quick to make (no soaking required!), with a slightly earthy flavour. It's a fantastic source of Omega-3 fatty acids and protein, and naturally creamy.
- Sunflower Seed Milk: An excellent option for those with nut allergies. It has a mild, slightly nutty taste and is great in both sweet and savoury applications.
- Pumpkin Seed Milk: Offers a unique, earthy flavour profile and is packed with zinc and magnesium. It's a distinctive choice for those looking to experiment.
Grain Milks: Budget-Friendly & Delicious
- Oat Milk: Incredibly popular for its natural creaminess and suitability for lattes. It's one of the most cost-effective options. The key is not to over-blend (1 minute max) to avoid a slimy texture.
- Rice Milk: Light, thin, and naturally sweet, making it a great hypoallergenic choice. It's excellent in smoothies or as a dairy-free base for light dishes.
Legume Milk: Protein Powerhouse
- Soy Milk: A traditional plant-based milk, well-loved for its higher protein content and often richer texture. Homemade soy milk offers a purer alternative to store-bought versions.
Other Plant-Based Delights
- Coconut Milk: While full-fat canned coconut milk is ideal for curries and rich desserts, lighter, carton-style coconut milk can also be made at home by blending shredded coconut with water and straining. It offers a subtle tropical flavour.
Beyond the Basics: Customizing Your Craft
Once you've mastered the foundational process, the real fun begins: customizing your homemade vegan milk to perfectly suit your taste and specific needs.
Sweeteners & Flavourings
Take full control over the sweetness and flavour profile of your milk:
- Natural Sweeteners: For refined sugar-free options, try blending in 1-2 pitted Medjool dates (soaked for softer blending), a tablespoon or two of maple syrup or agave nectar, or a few drops of monk fruit sweetener or stevia to taste.
- Flavor Enhancers: A splash of pure vanilla extract, a pinch of cinnamon, cardamom, nutmeg, or even a tablespoon of cocoa powder can transform your basic milk into a gourmet beverage. A tiny pinch of salt can also surprisingly enhance sweetness and overall flavour.
Vegan Fortification & Boosts
While homemade milk might not naturally contain the same fortified nutrients as commercial versions, you can add your own:
- Calcium: Blend in a small amount of food-grade calcium carbonate powder.
- B Vitamins: A spoonful of nutritional yeast can add a cheesy, umami flavour (best for savoury uses) and B vitamins.
- Protein Boost: For a protein-rich milk, blend in a scoop of your favourite unflavoured plant-based protein powder (e.g., pea protein).
- Omega-3s: A teaspoon of flax seeds or chia seeds (blend well) can add healthy fats.
Remember, when adding powders, blend them in thoroughly with warm water first for best dissolution, or add them gradually to your blender during the milk-making process.
Embrace Your Homemade Journey
Making your own vegan milk is more than just a culinary task; it's an empowering step towards a healthier, more sustainable, and truly delicious lifestyle. This comprehensive guide to vegan dairy free milk has shown you that ditching the store-bought cartons is not only simple but profoundly rewarding. From the pure, additive-free ingredients to the significant cost savings and endless customization possibilities, the benefits are clear. So, grab your blender, choose your favourite plant-based ingredient, and embark on a delicious journey of crafting your perfect plant-based milk. Your taste buds, your body, and your wallet will thank you.
